Shopping for a rental or planning a kitchen remodel? You’ll probably run into the term “washer dryer hookup” in listings, floor plans, or contractor estimates. It’s not complicated, but knowing exactly what it means can save you from surprise plumbing bills or the disappointment of discovering your new apartment can’t actually fit your appliances. A washer dryer hookup refers to the dedicated plumbing, electrical, and ventilation connections needed to install and operate a washing machine and dryer. This guide breaks down what those connections include, the different types you’ll encounter, and how to tell if your space is truly ready for laundry day.
Table of Contents
ToggleKey Takeaways
- A washer dryer hookup is the dedicated infrastructure including plumbing, electrical, and ventilation connections required to install and operate laundry appliances safely and to code.
- Proper hookups include hot and cold water supply valves, a 2-inch standpipe drain, a 120V outlet for the washer, and either a 240V outlet or gas line connection for the dryer.
- Side-by-side hookups work best in dedicated laundry rooms requiring about 60 inches of width, while stackable configurations fit tight spaces like closets and small apartments using just 24–30 inches.
- Before moving into a rental or closing on a home, verify water valves function properly, check standpipe height (34–42 inches), test electrical outlets with a plug tester, and inspect the dryer vent path to ensure it routes outside.
- Professional installation costs typically range from $2,000–$3,500 for a complete washer dryer hookup, while plumbing, electrical work, and gas connections require licensed contractors in most jurisdictions.
- Installing proper washer dryer hookup drainage requires ¼-inch slope per foot and a P-trap to block sewer gases, and dryer vents must use rigid metal duct (not flexible foil) routed directly outside to prevent fire hazards and ensure proper airflow.
What Does Washer Dryer Hookup Mean?
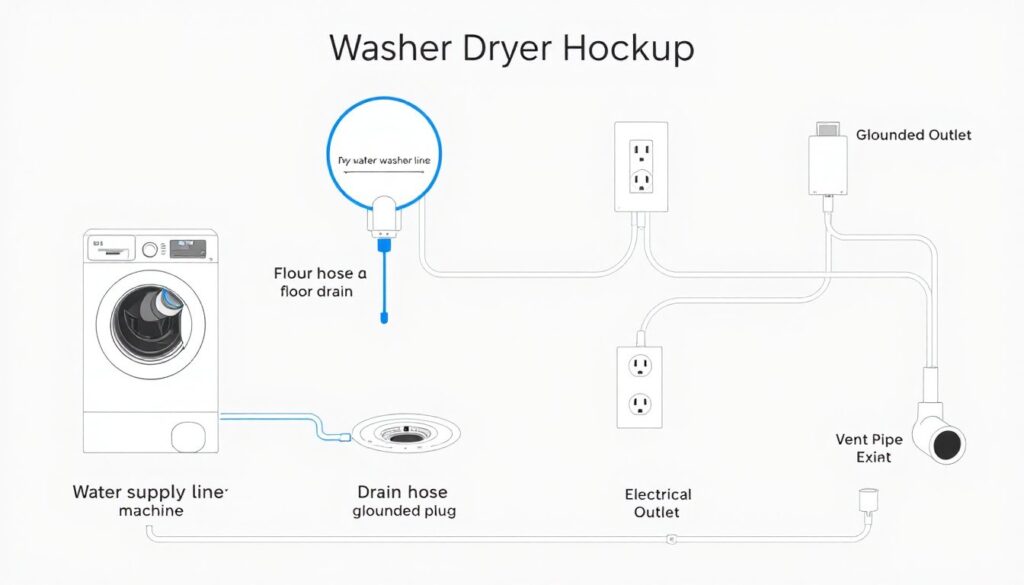
A washer dryer hookup is a designated space with all the infrastructure required to connect and run a washing machine and dryer. It’s not just an empty corner, it includes specific plumbing, electrical, and ventilation components installed during construction or remodeling.
When a home listing says “washer dryer hookup,” it means the builder or previous owner installed the necessary rough-in connections. You’ll typically find hot and cold water supply lines (usually ½-inch copper or PEX), a standpipe drain (2-inch diameter minimum per the International Plumbing Code), and a dedicated 120V outlet for the washer.
For the dryer, expect either a 240V outlet (NEMA 10-30 or 14-30 configuration) for an electric model or a gas supply line (black iron or CSST flexible gas line) for a gas dryer. Electric dryers also need a 4-inch rigid or flexible vent duct routed to the exterior to expel moisture and lint safely.
Without these components pre-installed, adding laundry capability means hiring a plumber and electrician to run new lines, often opening walls and requiring permits. That’s why understanding what the term “washer and dryer hookup” actually includes matters before you sign a lease or make an offer.
Types of Washer and Dryer Hookups Explained
Not all laundry setups look the same. The hookup configuration depends on your floor space, appliance type, and building layout. Here are the two most common arrangements.
Standard Side-by-Side Hookups
This is the classic setup: washer on the left, dryer on the right (or vice versa), sitting flush against a wall. You’ll need a minimum floor space of about 60 inches wide by 30 inches deep to accommodate both units, though adding a few extra inches for hose and vent clearance makes maintenance easier.
Behind the machines, you’ll find water valves mounted at roughly 42–48 inches above the floor, a standpipe drain (often integrated into a laundry box recessed into the wall), and the dryer’s electrical or gas connection. The dryer vent exits through the wall directly behind the unit or routes up and out through the roof, depending on the home’s design.
Side-by-side hookups work well in dedicated laundry rooms, basements, or garages where space isn’t a constraint. They’re easier to service, you can pull units forward without disconnecting everything, and accommodate full-size appliances with larger drum capacities.
Stackable Washer Dryer Hookups
Tight on square footage? Stackable hookups place the dryer directly above the washer using a stacking kit or an all-in-one combo unit. This setup typically requires only 24–30 inches of width, making it ideal for closets, hallways, or small apartments.
The plumbing and electrical connections sit lower, usually 12–18 inches off the floor, since the washer occupies the bottom position. The dryer vent still needs to route outside, but installers often run it vertically through a chase or horizontally through a nearby exterior wall.
One trade-off: accessing the dryer’s lint trap or controls means reaching overhead, and servicing the washer requires unstacking both units. But for urban apartments or homes built after 2010, stackable hookups are increasingly standard.
What You’ll Find in a Washer Dryer Hookup Space
Open the closet or step into the laundry room, and here’s what proper hookups should include:
Water supply valves: Two quarter-turn ball valves or traditional compression valves, one for hot, one for cold. They should be individually shut-off capable so you can service the washer without killing water to the whole house. Look for ½-inch threaded male outlets that accept standard washing machine hoses.
Standpipe or laundry sink drain: The washer’s discharge hose hooks over a standpipe (a vertical 2-inch PVC or ABS pipe) that connects to your home’s drain-waste-vent (DWV) system. The top of the standpipe should sit 34–42 inches above the floor to prevent siphoning. Some setups use a laundry sink instead, which gives you a bonus workspace for hand-washing or pre-treating stains.
Electrical outlet for the washer: A standard 120V, 15- or 20-amp grounded outlet within 6 feet of the washer location. It should be on a dedicated circuit or shared only with the laundry room lighting, not daisy-chained with the rest of the house.
Dryer power or gas connection: Electric dryers need a 240V, 30-amp outlet (newer homes use a 4-prong NEMA 14-30: older homes may have a 3-prong NEMA 10-30). Gas dryers require a shutoff valve on the gas line within 6 feet of the appliance, plus a 120V outlet for the drum motor and controls.
Dryer vent termination: A 4-inch diameter vent duct that exhausts to the outside, not into an attic, crawl space, or interior wall cavity. The Fine Homebuilding guide covers best practices for routing vent runs to minimize bends and maintain airflow. Rigid metal duct is preferred over flexible foil or vinyl, which can sag, trap lint, and create fire hazards.
How to Identify If Your Home Has Proper Hookups
Not every “laundry space” is actually ready for appliances. Here’s how to verify before moving day or starting a remodel.
Check the water valves: Turn them on and off. If they’re stuck, corroded, or leaking, you’ll need a plumber to replace them before connecting hoses. Verify the threads aren’t stripped, standard washer hoses use ¾-inch garden hose threads (GHT).
Inspect the standpipe height and trap: The standpipe should have a P-trap (the U-shaped pipe below) to block sewer gases. Measure from the floor to the top of the pipe, if it’s below 34 inches, the washer’s pump may cause drainage issues. If it’s above 42 inches, the hose might not stay secure.
Test the electrical outlets: Use a plug tester (a $10 tool from any hardware store) to confirm the 120V outlet is grounded and wired correctly. For the 240V dryer outlet, visually inspect for burn marks, loose prongs, or a recessed box that won’t accommodate your dryer’s plug. Older homes with 3-prong outlets can work with a grounding adapter or a dryer cord swap, but check local code, some jurisdictions require updating to 4-prong during appliance replacement.
Trace the dryer vent path: Follow the duct from where the dryer sits to the exterior termination. The International Residential Code allows a maximum equivalent length of 35 feet for rigid metal duct, minus 2.5 feet for every 90-degree elbow. Count bends, more than two elbows often signals poor airflow and longer drying times. Make sure the exterior vent hood has a damper to keep out pests and drafts.
Verify adequate space and clearance: Measure the alcove or room. Washers and dryers need 1–2 inches of clearance on each side for vibration and airflow, plus 4–6 inches behind for hoses and connections. If the space is a closet, check that the door can close with hoses attached, or that there’s enough ventilation if it stays open.
If any component is missing or substandard, you’re not looking at a true washer dryer hookup, you’re looking at a project that needs professional installation work to bring it up to code.
Installing Washer Dryer Hookups: DIY vs. Professional
Adding hookups from scratch is a multi-trade job: plumbing, electrical, venting, and sometimes carpentry or drywall. Here’s where DIYers can pitch in and where you should call in help.
Plumbing the supply and drain lines involves tapping into existing hot and cold water lines (often requiring soldering copper or crimping PEX fittings), running them through wall cavities or floor joists, and installing code-compliant shutoff valves. You’ll also need to cut into the drain stack, add a sanitary tee, and run a 2-inch drain line to the standpipe with proper slope (¼ inch per foot). Most jurisdictions require a permit and inspection for new drain work. If you’ve sweated copper before and understand venting requirements, this is doable, but slow. Otherwise, hire a licensed plumber.
Electrical rough-in means running a dedicated 20-amp, 120V circuit from the panel to the washer location using 12-2 NM cable (Romex), and a 30-amp, 240V circuit with 10-3 NM for an electric dryer. Both must be GFCI-protected if installed in a garage or unfinished basement per the National Electrical Code (NEC). This work requires a permit in most areas and an inspection before drywall closes up the walls. Unless you’re comfortable opening your panel and sizing breakers correctly, hire a licensed electrician.
Dryer vent installation is the most DIY-friendly part, if you have attic or crawl space access and can drill a 4¼-inch hole through an exterior wall. Use rigid or semi-rigid aluminum duct, seal joints with foil tape (not duct tape), and keep the run as short and straight as possible. Avoid flexible vinyl or foil ducts: they’re fire hazards and often violate code. You’ll need a hole saw, reciprocating saw, or jigsaw to cut the wall penetration and a vent hood kit for the exterior termination. Popular Mechanics offers solid walkthroughs for vent routing if you’re confident with power tools.
When to call a pro: If your laundry space is on an upper floor, shares a wall with another unit (condos/townhomes), or requires moving gas lines, don’t DIY. Gas work must be done by a licensed contractor in most jurisdictions, and improper venting or drain tie-ins can cause water damage, mold, or carbon monoxide issues.
Costs (ballpark, 2026 rates): Expect to pay $800–$1,500 for a plumber to rough in water and drain lines, $500–$1,000 for an electrician to add circuits, and $200–$400 for vent installation if walls are open. Add drywall patching, permits, and inspections, and a full hookup install can run $2,000–$3,500 depending on complexity and regional labor rates.
If you’re buying a home without hookups, factor these costs into your offer or negotiation. If you’re a landlord, investing in proper hookups increases rental appeal and justifies higher monthly rates, tenants consistently rank in-unit laundry as a top amenity.