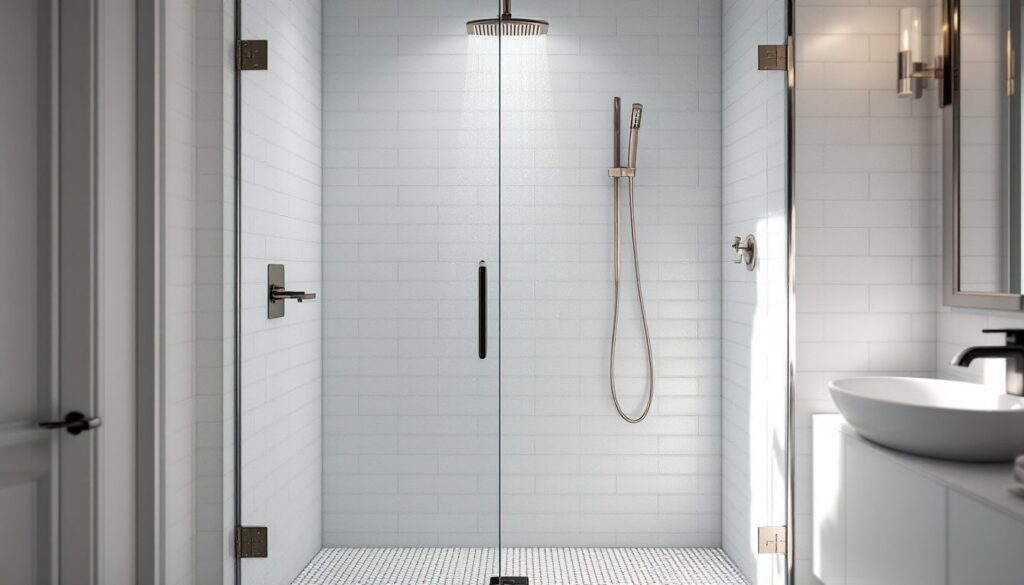
Walk-in showers have become the centerpiece of modern bathrooms, and the shower door makes or breaks the entire look. A well-chosen door turns a functional space into a sleek, spa-like retreat. A poorly matched one can leak, fog up your design vision, or make a tight bathroom feel even smaller. Whether upgrading a dated enclosure or planning a full remodel, understanding the differences between frameless and framed, hinged and sliding, or tempered and patterned glass helps homeowners make decisions they won’t regret three years down the line. This guide walks through the essential considerations for choosing and installing walk-in shower doors that fit the space, the budget, and the skill level.
Table of Contents
ToggleKey Takeaways
- Frameless shower doors for walk-in showers offer a modern, open aesthetic but cost $800–$2,500 and require precise installation, while framed doors are more affordable ($300–$900) and forgiving for DIYers.
- Tempered glass is mandatory for safety as it shatters into blunt pieces rather than sharp shards and must display CPSC 16 CFR 1201 compliance markings.
- Sliding doors work best in tight bathrooms, hinged doors provide the widest opening and suit most layouts, and pivot doors handle heavier panels but require more complex installation.
- Measure your shower opening at three points (top, middle, bottom) and ensure the curb is level to prevent leaks, improper door closure, or poor drainage.
- Framed shower doors are manageable DIY projects requiring basic tools and 3–5 hours, while frameless installations typically demand professional help due to weight, precision, and manufacturer warranty requirements.
- Hardware finishes like chrome, brushed nickel, and matte black should coordinate with other bathroom fixtures, and frosted or tinted glass options can enhance privacy and hide water spots better than clear glass.
Why Choose the Right Shower Door for Your Walk-In Shower
The shower door does more than keep water off the bathroom floor. It sets the visual tone, influences how light moves through the space, and affects long-term maintenance. A mismatched door can shrink a small bathroom or clash with high-end tile work.
Frameless doors open up sightlines and suit contemporary or minimalist designs. Framed doors offer more structural support at a lower price point and work well in traditional or budget-conscious remodels. The wrong choice can mean constant squeegee duty, water damage to drywall, or a door that doesn’t clear the toilet when it swings open.
Beyond aesthetics, the door impacts accessibility. Curbless entries and wide openings make walk-in showers safer for aging-in-place renovations or mobility concerns. The International Residential Code (IRC) doesn’t mandate specific walk-in shower door types, but local amendments may set minimum opening widths or require tempered safety glass. Check with the local building department before ordering custom glass.
Material durability matters too. Tempered glass is the standard for safety, it shatters into small, blunt pieces rather than sharp shards. Hardware finish (chrome, brushed nickel, matte black) should coordinate with faucets and cabinet pulls to avoid a mismatched look. Choosing the right door upfront saves money, prevents leaks, and keeps the bathroom looking intentional rather than like a parts-bin special.
Types of Shower Doors for Walk-In Showers
Frameless vs. Framed Shower Doors
Frameless doors use thicker glass, typically 3/8-inch to 1/2-inch tempered, and minimal hardware. They’re held in place by heavy-duty hinges or U-channels, creating clean lines and an open feel. The lack of metal framing means fewer crevices where soap scum and mildew collect. Frameless options cost more, often $800 to $2,500 depending on size and custom cuts, and require precise measurements. Even a 1/8-inch error can leave gaps or prevent the door from closing flush.
Framed doors feature aluminum or composite frames around the glass perimeter, which adds rigidity and allows the use of thinner 1/4-inch glass. They’re more forgiving during installation and typically cost $300 to $900. The frames come in various finishes, but the metal channels can corrode over time in humid bathrooms without proper ventilation. Framed doors often use rubber gaskets or sweeps to seal gaps, which need periodic replacement as they compress or tear.
Semi-frameless designs split the difference: framed around the edges but with a frameless look on the door itself. They offer moderate cost savings and a slightly more modern appearance than fully framed units. For DIYers, framed and semi-frameless doors are easier to install without professional templating, though they still require level walls and plumb measurements.
Sliding, Hinged, and Pivot Door Options
Sliding doors (also called bypass doors) work well in tight bathrooms where swing clearance is limited. They ride on top and bottom tracks, overlapping when opened. The tracks collect hair and grime, requiring regular cleaning to keep the rollers moving smoothly. Sliding doors typically require a niche or alcove configuration, three walls with the door spanning the opening. They’re not ideal for corner or neo-angle showers.
Hinged doors swing outward or inward on pivoting hardware. They provide the widest opening and suit bathrooms with clearance space, usually at least 30 inches beyond the door swing. Hinged doors can be mounted to a wall or to a stationary glass panel (a return panel). They’re common in frameless designs and work for alcove or corner showers. Make sure the floor is level: an unlevel threshold can prevent the door from closing properly or cause it to swing open on its own.
Pivot doors rotate on a central or offset pivot hinge rather than side-mounted hardware. They handle heavier glass panels and create a striking, commercial look. Offset pivots allow the door to swing both inward and outward slightly, useful in cramped spaces. Pivot hardware is more complex to install and may require a thicker glass panel, 1/2-inch is typical, to support the pivot mechanism without flexing.
Some walk-in showers skip the door entirely, using a wet room configuration with open access and sloped floors. That setup demands meticulous waterproofing and drainage but maximizes accessibility.
Materials and Glass Options for Walk-In Shower Doors
Tempered glass is non-negotiable for safety. It’s heat-treated to be four to five times stronger than standard annealed glass and breaks into pebble-like fragments if shattered. Building codes in most jurisdictions require tempered glass for shower enclosures. Each panel should have a small etched or sandblasted mark in the corner indicating CPSC 16 CFR 1201 compliance.
Clear glass is the most popular choice, it keeps small bathrooms feeling open and showcases tile work. Fingerprints and water spots show easily, so many homeowners apply aftermarket hydrophobic coatings or opt for factory-applied treatments that repel water and soap buildup.
Frosted or patterned glass adds privacy without sacrificing light. Rain, reeded, or obscure textures diffuse the view while still allowing natural or artificial light to pass through. Frosted glass can be full-coverage or applied in decorative bands. It hides water spots better than clear glass but can be harder to clean if the texture is deep.
Tinted or smoked glass (gray, bronze, or black) creates a modern, dramatic look. It works well in larger bathrooms where the darkened glass won’t make the space feel cave-like. Tinted glass may cost 10% to 20% more than clear, depending on the supplier.
Hardware finishes should match or complement other bathroom fixtures. Chrome is classic and budget-friendly: brushed nickel hides fingerprints: matte black suits industrial or modern styles but can show water spots in hard-water areas. Upgrading hardware finish can add $50 to $200 to the project.
Handles, towel bars, and hinges are often sold as coordinated sets. For frameless doors, through-glass drilling is required to mount hardware, this must be done before tempering, so custom orders take longer and can’t be easily modified on-site. Off-the-shelf kits come pre-drilled, limiting customization but speeding up the process.
Measuring and Planning Your Walk-In Shower Door Installation
Accurate measurements prevent expensive mistakes. Measure the shower opening at three points, top, middle, and bottom, for both width and height. Walls and floors are rarely perfectly plumb or level, especially in older homes. Record the smallest dimension to ensure the door fits without forcing or leaving gaps.
For alcove showers, measure the distance between the two side walls at the threshold, mid-height, and near the top. If the variation exceeds 1/4 inch, a framed door with adjustable channels is more forgiving than a custom-cut frameless panel. For corner or neo-angle showers, measure each wall segment and the angles between them. Standard neo-angle doors assume 90-degree corners: if the walls are out of square, custom templating may be necessary.
Check that the shower curb or threshold is level front to back and side to side. A bubble level or laser level works for this. An unlevel curb can cause a hinged door to swing open or closed on its own, or prevent a sliding door from moving smoothly. If the curb is more than 1/4 inch out of level over a 60-inch span, it may need to be shimmed or rebuilt before installing the door.
Note the location of studs or blocking behind the tile if mounting hinges or a stationary panel to the wall. Most frameless hardware requires screws driven into solid backing, drywall anchors won’t support the weight of 1/2-inch tempered glass. If there’s no stud where the hinge needs to go, install blocking between studs during the rough framing stage, or use a surface-mounted U-channel that distributes the load.
Confirm that the shower floor or pan has proper slope, 1/4 inch per foot, toward the drain. Poor drainage can cause water to pool near the door, increasing the chance of leaks. If adding a curbless entry, the bathroom floor must also slope toward the shower drain or a separate floor drain, which may require a mortar bed or foam pre-slope pan.
For DIYers ordering online or from big-box stores, standard sizes (60 inches, 48 inches, 36 inches wide) are readily available. Custom sizes add $200 to $800 and extend lead times to four to six weeks. Many retailers provide printable measurement guides or video tutorials on their sites. Resources like homify offer design inspiration and layout examples to help visualize how different door styles fit various bathroom configurations.
DIY Installation vs. Professional Installation: What Homeowners Need to Know
Framed shower doors are manageable DIY projects for homeowners comfortable with basic tools. Most kits include the door, frame, hardware, and a bottom seal or sweep. Expect to spend three to five hours on installation. The main challenges are keeping everything level and plumb, drilling into tile without cracking it, and adjusting the frame to compensate for out-of-square walls.
Tools needed:
- Cordless drill with adjustable clutch
- Masonry or carbide-tipped bits for tile
- Level (4-foot recommended)
- Tape measure
- Hacksaw or angle grinder (for cutting metal frames to length)
- Caulk gun and silicone sealant (100% silicone, mold-resistant)
- Safety glasses and gloves
When drilling into tile, use a carbide or diamond-tipped bit and start at low speed with light pressure to avoid cracking. Place painter’s tape over the drill point to prevent the bit from wandering. Drill pilot holes first, then switch to the final diameter.
Frameless doors are significantly more difficult to install without experience. The glass is heavy, 80 to 150 pounds for a typical panel, and requires two people to maneuver safely. Mounting holes are pre-drilled in the glass, so alignment must be exact. If the walls aren’t plumb, shims or adjustable clamps are needed, and even minor errors can cause the door to bind or leave gaps that leak.
Many frameless door manufacturers won’t honor warranties if the door isn’t installed by a certified professional. Custom templating services measure the shower on-site, fabricate the glass to fit, and return for installation. This reduces the risk of ordering the wrong size or damaging expensive glass during handling. Professional installation typically costs $300 to $600 on top of the door price, but it includes liability coverage and warranty protection.
If going the DIY route with a frameless kit, recruit a helper and clear the workspace. Use a suction cup lifter or glass carrier to move panels without fingerprinting the glass or stressing the edges. Have shims, a level, and a pencil ready to mark mounting holes before drilling.
Permitting is rarely required for replacing a shower door, but check local codes if altering the shower curb, moving plumbing, or changing the enclosure footprint. Some jurisdictions require a permit for any work involving water-resistant barriers or drainage modifications.
Safety warnings:
- Always wear safety glasses when drilling tile or handling tempered glass.
- Tempered glass can shatter if the edge is chipped or the mounting hardware is over-torqued.
- Use a stable stepladder or work platform, don’t balance on the edge of the tub.
- Have a second person support heavy glass panels during installation to prevent injuries or breakage.
For homeowners unsure about their skill level, many pros from networks like This Old House offer consultation or partial install services, they’ll template and mount the hardware, leaving the homeowner to handle finish caulking and cleanup. That middle-ground option reduces labor costs while ensuring the critical steps are done correctly.